Paragraph Style
A paragraph is a contiguous range of characters sharing formatting properties such as:
- Alignment
- Margins
- Indentation
- Tab stops
- Formatting marks
- Copy Fitting
Paragraphs are separated by carriage returns. To start a new paragraph, press ENTER while you are typing text.
To align text
To apply alignment to all paragraphs in one or more text objects:
- Select the objects.
- (Windows): Click an alignment button in the Text Formatting toolbar. Alternatively in the Properties Panel, select Alignment.
(Mac OS): Click an alignment button in the Text Formatting toolbar. Alternatively from the Text menu, select Alignment.
To apply text alignment for a specific paragraph:
- Double click in a text object to enter Edit mode.
- Select a paragraph.
- (Windows): Click an alignment button in the Text Formatting toolbar. Alternately, from the Text menu, select Paragraph. In the dialog box, you can specify alignment, margins and first line indentation values. An appearance sample is provided to preview the current settings.

(Mac OS): Click an alignment button in the Text Formatting toolbar. Alternatively from the Text menu, select Alignment.
Text direction
To apply text direction.
- Double click in the text box to enter in Edit mode.
- In the Text Formatting toolbar, click on the Right to Left button.
Windows
About tab stops
Tab stops enable you to line up text to the left, right or center.
You can select the following tab stops:
|
|
Left Tab |
Text extend to the right from the tab stop. |
|
|
Center Tab |
Text is centered at the tab stop. |
|
|
Right Tab |
Text extends to the left from the tab stop until the tab's space is filled, and then the text extends to the right. |


To set and change tab stop positions
To change default tab stop positions:
- From the Text menu, select Default Tab Stops.
- Choose your interval value.
- Click OK.
To set and remove custom tab stop positions, there are two methods available:
-
Use the Tab Stops dialog box.
-
Use the horizontal ruler.
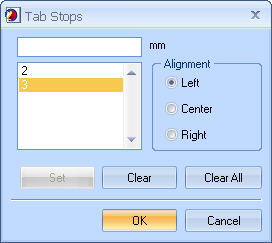
To use the Tab Stops dialog box:
- Double click in a text object to enter Edit mode.
- Select a paragraph.
- From the Text menu, select Tab Stops.
Tab stop positions are relative to the left side of the text object. - To add a position, type a value in the edit box and click Set.
- To add alignment, you can select:
Left: Left text extends to the right from the tab stop.
Center: Center text is centered at the tab stop.
Right: Right text extends to the left from the tab stop until the tab's space is filled, and then the text extends to the right. - To remove a position and alignment, select it in the list box and click Clear.
Formatting marks
PrintShop Mail enables you to control whether formatting marks are hidden or visible in text objects. Formatting marks are newlines, tabs, and spaces. By default, after starting PrintShop Mail, all formatting marks will be hidden.
You can tell PrintShop Mail to show formatting marks by selecting from the View menu Formatting Marks, or by using the button "Show or Hide Formatting Marks" on the View toolbar. This works as a toggle for all text objects.
Formatting marks are just a visual aid, they will not be printed. The marks will scale to the zoom factor of your document, and they will scale to the font size of the surrounding text. They will also be visible while you're editing text.
New line symbol: 
Space symbol: .
Tab symbol: (right arrow)
Copy Fitting
Copy fitting is a feature that will automatically shrink text by reducing the font size, when there is more text than the text box can hold. The font size will be reduced to the font size needed to fit the text in the text box. However, text will not be shrunk beyond the specified minimum font size. When the text needs to be resized, all text will be resized step by step until the text fits or the minimum font size is reached.
Minimum font size
When Copy Fitting is enabled, the minimum font size the font can reach is 1; by default the minimum font size is 8. The downsizing of the text in the box stops if one of the containing font sizes reaches the minimum value or if the text fits.
Allow line breaks
By default the Allow line breaks feature is set to Yes.
When Allow line breaks is set to "Yes", the texts only fit if the individual words are not broken. Text will break on spaces only. It can occur that lines are broken at spaces, but individual words won't be broken.
When Allow line breaks is set to “No”, the text won't break at spaces, only at returns. The text will be downsized until it fits (or gives a warning if it still doesn’t fit)
To change this option:
- Select the text box. If you have multiple text boxes, you can select all of them.
- In the Properties Panel/ Content, select Copy Fitting.
- Set Reduce Font Size to Yes.
- Change the Minimum Font Size to the desired value.
Mac OS
To change Paragraph settings
You can set the space between lines of text by using the Spacing pop up menu on the PrintShop Mail ruler when a text box is in edit mode.

To set the line spacing, double click on the text object and select the text you want to adjust and choose Single, Double, or Other from the Spacing pop up menu.
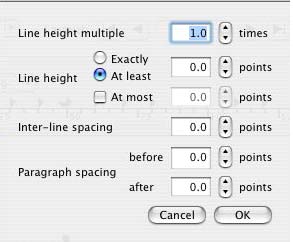
If you chose Other, choose options for:
-
Line height: Distance from the top of a line to the top of the line below it.
-
Inter-line spacing: Distance from the bottom of a line to the top of the line below it.
-
Paragraph spacing: Distance from the bottom of a paragraph to the top of the first line in the paragraph below it.
To change default tab stop positions:
You can set margins, paragraph indentation, and text tabs by using the ruler in the edit mode of the text box.
There are four kinds of tab stops and two types of margins, each indicated by a differently shaped icon:
- A right facing triangle indicates a tab stop at which text will be left justified.
- A diamond indicates a tab stop at which text will be centered.
- A left facing triangle indicates a tab stop at which text will be right justified.
- A circle indicates a decimal tab stop at which numbers will be justified around a decimal point.
- A downward facing triangle indicates a page margin.
- A horizontal rectangle indicates the indentation of the first line of a paragraph.
To use the horizontal ruler:
- Left click on the horizontal ruler to add a paragraph marker.
The marker type depends on the state of the paragraph marker button in the intersecting area of the two rulers (top-left). - Left click the paragraph marker button to cycle through all possible paragraph marker types, including first line indentation, or right click this button to select a marker type from the menu.
Note: You can also use the horizontal ruler to specify left and right margins. To do this, left click on the position of either the left or right side of the text box and drag the margin to the desired location.
Copy Fitting
To change this option:
- Select the text box.
- From the Item menu, select Show Objects Properties.
- In the Object Properties, change Copy Fitting to Yes.
- Change the Minimum Font Size to the desired value.