Styling templates with CSS files
The Layout toolbar and the Format menu offer many possibilities to style every piece of a template. However, styling every single element, one after another, is a lot of work and, more importantly, can result in a template with a messy mix of styles that isn’t easy to maintain and lacks consistent design. Therefore the preferred way to style templates is with CSS: Cascading Style Sheets.
The basic idea behind CSS is to separate the structure and contents of a (HTML) document as much as possible from the presentation of that document.
Cascading Style Sheets were originally designed for use with web pages, or HTML files. Since every template in the Designer is constructed in HTML, CSS files can also be used in the Designer.
Instead of setting the font size, line height, color etc. for each and every paragraph in the template itself, you can define a layout for all paragraphs, and for all output channels, in a CSS file.
The benefit of this is that you can quickly and easily change the look and feel of all contexts in one template, without having to change the contents. In the event that your company chooses to use another font or to adjust its corporate colors, you only have to change the style sheets.
You are writing HTML
When you add elements, such as text, images or a table, to the content of a template, you are actually constructing an HTML file.
To see this, toggle to the Design tab in the workspace. Click anywhere in the content. Take a look at the breadcrumbs at the top of the workspace. The breadcrumbs show the HTML tag of the clicked element, as well as the HTML tags of other elements to which the clicked element belongs. The clicked element is at the end of the line.
To edit the HTML text directly:
- In the workspace, toggle to the Source tab.
On this tab you can view and edit the content of the template in the form of plain text with HTML tags (note the angle brackets: <>). You may add and edit the text and the HTML tags, classes, ID’s and other attributes.
To learn more about HTML, see for example https://developer.mozilla.org/en-US/docs/Web/Guide/HTML/Introduction and http://www.w3schools.com/html/default.asp.
Many video courses and hands-on courses about HTML (and CSS) are offered on the Internet as well, some for free. Go, for example, to www.codeschool.com or www.codeacademy.com and look for HTML (and CSS) courses.
Included Cascading Style Sheets
When you create a template, a number of style sheets is automatically included:
- One style sheet that applies to all document types: context_all_styles.css.
- One or more style sheets specific to the context (Print, Email
- A style sheet that defines default styles for tables: default.css. It contains the styles that you can choose from when you insert a table via the Insert menu or the Insert table toolbar button.
Do not change the default.css style sheet. Use the global style sheet or the style sheet for the relevant context to define your own styles for tables.
Adding CSS files
To add a CSS file of your own, open an Explorer window, drag the file to the Resources pane and drop it on the Stylesheets folder.
To create a new CSS file, right-click the Stylesheet folder on the Resources pane and select New Stylesheet.
To export a CSS file from your template, drag or copy/paste it out of the Stylesheets folder to a folder on the local hard drive.
The order in which style sheets are executed, can affect the actual output. This sequence can be set per section; see Determining the order in which style sheets are read.
Using a remote style sheet
A remote style sheet is not located within your template but is rather hosted on an external web server (generally called a CDN). When generating Web output, these files are referenced in the web page's header and are served by the remote server, not by the PlanetPress Connect Server module.
To add a remote style sheet:
- Right-click the Stylesheet folder on the Resources pane, and click New Remote Stylesheet.
- Enter a name for the file as it appears in the Stylesheet resources. For better management, it's best to use the same filename as the remote resource.
- Enter the URL for the remote resource. This must be a full URL, including the http:// or https:// prefix, domain name, path and filename.
- Optionally, for a Capture OnTheGo Form, you can check Use cached Capture OnTheGo resource, to prevent downloading a remote style sheet again if it has been downloaded before. The file should be available on a publicly accessible location, for example: a folder location on a corporate website, hosted by a CDN (Content Delivery Network) or shared via a Workflow process.
There are a few advantages to remote resources:
- These resources are not served by your server, saving on space, bandwidth and processing.
- Using a popular CDN takes advantage of caching - a client having visited another website using that same CDN will have the file in cache and not re-download it making for faster load times for the client.
Styling your templates with CSS files
Email clients do not read CSS files and some even remove a <style> tag when it is present in the email's header. Nevertheless, CSS files can be used with the Email context in the Designer. When generating output from the Email context, the Designer converts all CSS rules that apply to the content of the email to inline style tags, as if local formatting was applied.
Step 1: edit CSS
Editing CSS using a property sheet
- Select Edit > Stylesheets.
- Click the downward pointing arrow next to Global and select the context that you want to edit styles for, or select the Global CSS file to edit CSS rules that apply to all contexts.
- Click New, or click one of the selectors that are already listed and click Edit.
- Type a CSS selector. This can be:
- A class:
.class. Class rules apply to all HTML elements with that class. When you create a class, choose a name that indicates what the class is used for, e.g. ‘small’ for a class that gives elements the font size ‘small’. The class name has to be preceded by a dot, e.g..small. - An ID:
#id. An ID is always preceded by #, e.g.#sender. When you create an ID, choose a name that indicates what the ID is used for, e.g. #sender would refer to the HTML element with information about the sender.Each ID should be unique and can only be used once in each section.
- An HTML element: p, h1, table, etc. Type the tag name without the angle brackets.
- A combination of HTML elements, separated by a comma. The CSS rule will apply to all HTML elements that are listed in the selector. For instance, a CSS rule with the selector “h1, p” applies to first level headings as well as paragraphs.
- HTML elements inside other HTML elements. For instance, a rule for all paragraphs inside a div element has the selector: div p.
- Etcetera. See http://www.w3schools.com/cssref/css_selectors.asp for more CSS selectors and combinations of CSS selectors.
- Select the layout options that should apply to selected elements; see Styling and formatting. Note: where a width can be set as a percentage, it is a percentage of the space between the margins.
- Click OK.
- In the Stylesheets dialog, click the selector that you chose. All CSS rules for that selector will become visible in a box below the list of selectors.
Edit plain CSS
- Click the button Advanced in any property sheet to open a CSS property editor. Type CSS properties at the left and values at the right.
- In the Resources pane at the left, double-click the global stylesheet or the stylesheet for the relevant context. The file opens in the workspace in the middle.
A list of all CSS properties and their possible values can be found here: http://www.w3schools.com/cssref/.
Step 2: apply CSS to the content
After editing the CSS file(s), make sure that the CSS rules actually apply to one or more elements in the template.
CSS rules for HTML elements, such as paragraphs, are automatically applied to all elements with the corresponding HTML tag.
To make a CSS rule for a certain class or ID work for an element in your document, you have to add the class or ID to that HTML element.
Classes may be reused throughout one section, but a specific ID should not be used more than once in each section.
CSS layout rules for an element with a certain ID only apply to the first element with that ID in each section.
If you have two sections inside of a Print context, then you can have the same ID on two sections; t hey will both be affected by the CSS rules for the element with that ID.
Adding a class or ID to an HTML element
- Select the element (see Selecting an element).
- On the Attributes pane, type the ID and/or class.
Type the ID without the preceding # and class names without a dot.
Note: Elements can have multiple classes. Separate the class names with a space (eg. “red small”).
Alternatively, after selecting an element, you can click the Source tab at the bottom of the workspace. The selected element will be highlighted in the source. Add the class or classes and/or the ID to the opening tag of the HTML element, for example: <p class=”intro”>.
How to determine which styles are applied
To see which styles are applied to an element, select the element (see Selecting an element) and take a look at the Styles pane that sits next to the Attributes pane.
The Styles pane shows which CSS style rules apply to the currently selected element.
A link next to a style rule will open the file where that particular style is defined. This can be either a CSS file or the source file of a section if local formatting was used (see Styling and formatting).
A crossed-out style rule signals that it was overruled by another style rule. This happens when:
- A more specific, and therefore more important rule, is encountered for the same element. See Using a more specific CSS rule to learn more about the specificity of style rules.
- A rule with the same importance is read after the first rule. Not only is the order of the rules in a CSS file important, but also the order in which the style sheets are read. The style sheets that are included with a section are read in the specified order; see Determining the order in which style sheets are read.
Using a more specific CSS rule
By default, many CSS properties of an HTML element also apply to the elements inside that element. For example, a CSS rule that specifies a certain font-type for a box is also applied to paragraphs in that box. In this example the box is the 'parent' element and the paragraphs are the 'child' elements that inherit the font-type property of the box.
Although the background color property seems to be inherited, it isn't. Most elements are transparent; therefore the background color of the parent element shines through.
To replace inherited style properties, you need to add a more specific CSS rule for that (type of) element. In case of a conflict between a general rule and a more specific rule, the more specific rule will be applied.
The following diagram shows the order of specificity.
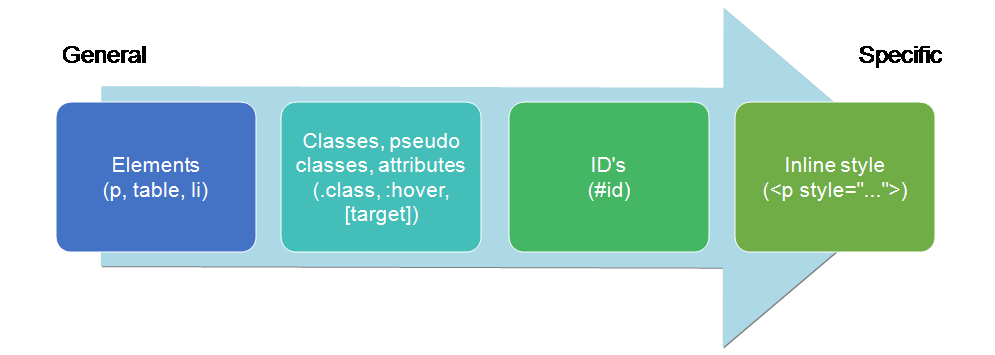
Rules for HTML elements (p, table, li etc.) are general rules. Rules for classes, pseudo classes, and elements with a certain attribute (.class, :hover, [target]) are more specific. Rules for elements with a certain ID are even more specific. The most specific are inline styles.
Example
A more specific rule for cells in a table that has the CSS property “color: red” (which colors text in the cells red) could be, for example:
- A rule for the text color of all table cells (td elements), for example:
td { color: green; }. - A rule for the text color of table cells with a certain class, for example
.green { color: green; } - A rule for the text color of a table cell with a certain ID, for example:
#greentext { color: green; } - An inline style rule (local formatting) added to the HTML tag of a particular table cell, for example:<td style="color: green;">...</td>
Each of these rules is more specific than the previous rules. All of these rules are more specific than the rule that applies to the table as a whole.
Determining the order in which style sheets are read
For each section, the style sheets are applied in a certain order. The styles in each following style sheet add up to the styles found in previously read style sheets. When style sheets have a conflicting rule for the same element, class or ID, the last style sheet ‘wins’ and overrides the rule found in the previous style sheet.
The order in which style sheets are applied, can be changed per section:
- On the Resources pane, expand the Contexts folder, expand the folder of the corresponding context and then right-click the template.
- Click the tab Includes.
- Click a CSS file and use the Up and Down buttons to change the order in which the style sheets are read.
- Note: Moving a style sheet up in the list gives it less weight, because style sheets read later will override previous ones in case of conflicting rules.