SMTP Input
SMTP Input tasks are used to receive SMTP requests made by any email client or other SMTP commands and can act as an SMTP proxy, processing emails before they are sent to another SMTP server. In order for this task to receive files, the SMTP Server (also called "Outgoing Email Server") in the email client must point to PlanetPress Workflow server's IP or hostname.
Emails received through this task will not reach their intended destination if the process does not end with a Send Email Output Task, or contain the PlanetPress Connect Create Email Content task.
Example
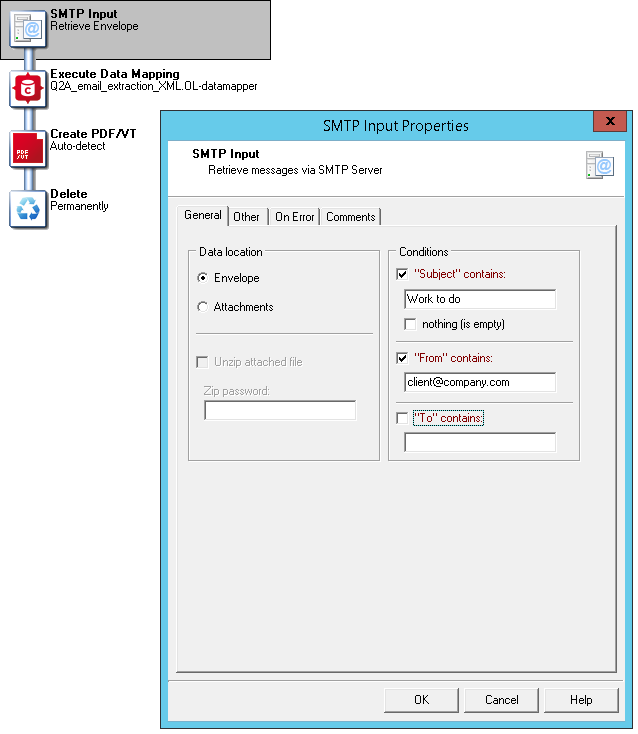
In this example, the SMTP Input plugin is used to capture incoming emails data that must meet certain conditions as the subject that contains "Work to do" and the sender that contains "client@company.com ". The process then redirects the content of those emails to an extraction and finally to a PDF printing.

Input
The SMTP Input task does not, by itself, capture any files. Neither does it directly wait for requests to be received. Actually, it is the SMTP Server service that receives the requests and places them in a specific location on the drive. When a request is received, the SMTP Input polls that location and finds the requests and all attachments. It will always pick up the "oldest" request received.
Due to a technical limitation the SMTP Input task does NOT receive the BCC addresses from most emails sent to it.
Processing
The task reads the incoming SMTP request and provides the data within its body.
Output
Depending on the Data Location option, the output is different:
- Envelope: The request file in XML format, including all email fields (from, to, cc, bcc, subject, body) as well as additional header fields (email client information, attachments, etc). The message body and attachments are available through specific XML attributes. These files do not have the full path, but you can use the %t%O variable to get the current temporary folder where they are located.
- Attachments: The input task loops through each attachment and sends them down through the process. While the Envelope is not available, the Job Infos contain pretty much all of the information you would get from it.
With
%t%O\xmlget('/ppemail[1]/body[1]/@html',Value,KeepCase,NoTrim)and
%t%O\xmlget('/ppemail[1]/@rawemail',Value,KeepCase,NoTrim)we get both the body and the whole raw email.
Task properties
General Tab
- Data location: Determines what files are sent into the process:
- Envelope: Only the request envelope is sent to the process (see above).
- Attachments: Each attachment is sent down the process (see above).
- Unzip attached file: Select to unzip the attached files.
- Zip password: Enter the password required to unzip the attached files (if any). Note that you can use variables and data selections.
- Conditions: Defines a filter on capturing files from the SMTP Service's hot folder. When a condition is added, only files that match this filter are captured, the rest remain untouched.
-
- “Subject” contains: Select to limit those messages used by this task to those with a specific subject. The subject you enter in the box below can include variables and wildcards.
- Nothing: Select to limit those messages used by this task to those that do not specify any subject.
- “From” contains: Select to limit those messages used by this task to those that are sent from a specific address. The address you enter in the box below can include variables and wildcards.
- “To” contains: Select to limit those messages used by this task to those that are sent to a specific address. The address you enter in the box below can include variables and wildcards.
"Other" Tab
- Job Information group
- Information elements: Indicates what Job Info variables are automatically created by the input task.
- Add lines before first data page: Using the arrows keys you can add any job information directly at the beginning of your data file.
- Backup input files: Check this to save a copy of each data file that is captured by your input. These files are saved in the PlanetPress Workflow Tools working folders under the "Backup" folder.
- Backup filename: Enter the file name that you wish the input data file backup to be saved under.
- Delete Existing Metadata: Check to remove any Metadata from memory. This option is disabled on initial input tasks, and is checked by default on secondary input tasks.
On Error Tab
For a description of the options on the On Error tab see Using the On Error tab.
Miscellaneous Tab
The Miscellaneous tab is common to all tasks.
It contains a text area (Task comments) that lets you write comments about the task. These comments are saved when the dialog is closed with the OK button and are displayed in the Task Comments Pane.
Check the option Use as step description to display the text next to the icon of the plugin in the Process area.
The tab also provides an option to highlight the task in The Process area with the default color, set in the Preferences (see General appearance preferences), or the color selected or defined under Highlight color on this tab.
To revert the selected highlight color to the default color, open this tab, turn the Highlight option off and close the dialog with the OK button; then turn highlighting back on.
Highlighting can also be turned on and off via the task's contextual menu and with the Highlight button on the View ribbon.