Process properties
To have access to the properties of a process or subprocess:
- Right-click on the process in the Configuration Components pane.
- Select Properties.
You can also double-click on the process to show its options.
Subprocesses do not have the General tab which is only used for scheduling, but they do have the Information tab.
Options
General tab
- Active: Select to make the process active. Clear to prevent this process from running when you send the configuration to PlanetPress Workflow.
- Startup: Select to make this process a startup process (see: Startup processes). This option is not available for self-replicating processes and error processes.
The order in which the Startup processes are arranged in the Configuration Components pane determines, from top to bottom, the order in which the Startup processes are executed when the Workflow Service launches. To change the order you may drag and drop them (see Moving and copying configuration components). - Self Replicating: Check this if you want the process to replicate itself in the background when multiple input files are received simultaneously. When this is checked, the input task polls its source once, determines the number of files to process, then replicates itself up to the maximum allowed and treats the files simultaneously. The initial process runs again once it has completed itself and replicates again as necessary, until all files have been processed.
- Max percentage of threading (%): Determines how many processes you may have running at the same time. This is a percentage of the maximum number of threads specified in the Messenger plugin preferences. For example if the maximum number of threads is 10 and you specify 50% here, a maximum of 5 replications will occur (the original process + 4 copies).
- As soon as possible: Select to have the process run continuously. Clear to enable the Time Grid to fine-tune the schedule of the process.Non-startup processes starting with the HTTP Server Input, NodeJS Server Input, LPD Input or SMTP Input task will run trigger-based if they are set to run As soon as possible with a Polling interval of 0. This reduces CPU usage.
- Day(s) to keep backup: Indicate the number of days to keep backups of jobs processed by input tasks. Note that backups will only be kept for those input tasks that have the Keep backup file option selected and that they are required to resubmit input files.
- Polling interval: Enter the frequency (in seconds) at which the process should verify if there are new jobs to process. The polling interval also applies to scheduled tasks that only run on certain times. For example, if your process polls every 30 seconds on a task that's only scheduled to run one hour per week, it will capture the input 120 times during that period.The polling interval is ignored when multiple files are present in the input and will be used only when there are no longer any files to process.
- Month: Select the month of the year when the process should be run or select All months to have the process run all year long. This option is disabled when "As soon as possible" is checked.
- Week of month / by date: Select the desired option for the time grid. Note that any selection you make in this box will be interpreted based on the selection made in the Month box. If you chose All months in the Month box and Last in the Week of month / by date box, then the process will run on the last week of every month. If you chose January in the Month box and First in the Week of month / by date box, then the process will run only on the first week of January.
- Select Date to display dates on the grid’s top ruler.
- Select any of the other options to display days on the top ruler.
- Select All weeks to have the process run every week.
- Select First, Second, Third or Fourth to have the process run on the first, second, third or fourth week.
- Select Last to have the process run only on the last week.
- Time division: Select the duration of each daily segment in the time grid. If you select 00:15, each segment will represent only 15 minutes and each day will be made up of 96 blocks (4 blocks per hour times 24 hours). If you select 24:00, each segment will represent an entire day.
- Poll once per activity period: Select to perform this process’ initial input task no more than once for each set of contiguous blocks (blocks that are on the top of one another). Choosing this option overrides the polling interval option. By default since the Time Grid blocks are divided by hours, this option will make your polling happen once every hour.
- Minimal logs: With this option enabled, the process will only log its Start time and the End time (along with the Time Spent), if no error was encountered during execution of the process. In case of an error, the entire process information is logged.
The Time Grid
The PlanetPress Workflow Process Options dialog box includes a time grid that lets you set exactly when you want a process to poll. The grid is composed of blocks that represent time periods on a given day. To activate the Time Grid, the "As soon as possible" option must be unchecked.
In the Time Grid, a blue block will indicate that the process is active within that time block. White blocks mean the process will not poll.
Note that when multiple files are present in the input, these may continue to be processed after the period set in the time grid. The Folder Listing plugin in combination with a Time of Day Condition could be used to prevent further processing of those files.
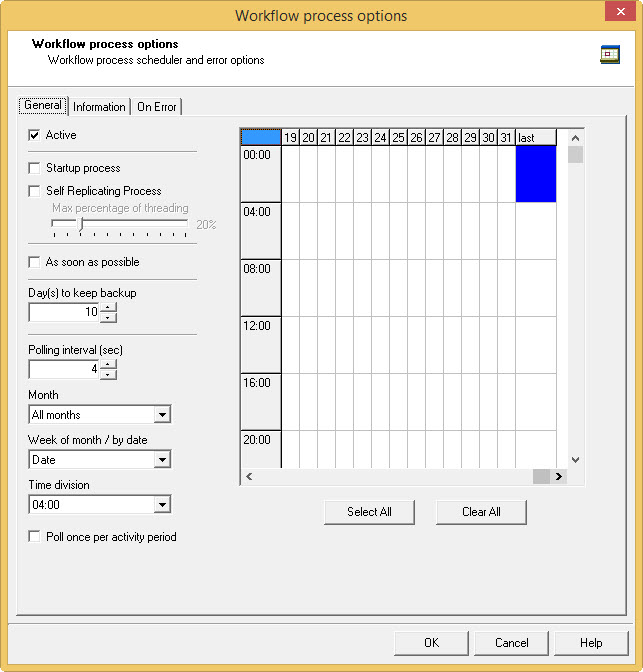
- Click on any block to select / deselect it.
- Click and drag from one block to another to toggle all blocks between the two.
- Shift-click on any block to toggle all blocks from the top-left corner of the grid to the block you click.
- To select all of the time segments for a given day or date, click the day or date on the top grid ruler. To deselect all of the time segments for a given day or date, CTRL+click the day or date on the top grid ruler.
- To select all the days or dates for a given time segment, click the time segment on the left grid ruler. To deselect all the days or dates for a given time segment, CTRL+click the time segment on the left grid ruler.
- To select the entire grid, use the Select All button located below the grid. To deselect the entire grid, use the Clear All button located below the grid.
"Toggle" means turn on when it's off and vice versa, when selecting multiple blocks in one command. This means if you select a certain number of blocks in the Time Grid and then use the shift+click or drag method, blocks that are on will turn off.
Changes made to the system time can have adverse effects on the processes managed by PlanetPress Workflow. When changing from daylight saving time to standard time, for example, if PlanetPress Workflow starts a given process at 2:00 AM, and if the system time is then taken back to 1:00AM, the application will start a new instance of the same process when the system time reaches 2:00 AM for a second time. So, when you manually change the system time, be aware that it may have an effect on PlanetPress Workflow and its processes. And for those cases when you know the system time will change automatically, you may consider creating special schedules.
Information tab
The Information tab lets you enter information that is not critical to your process but may help others (or yourself in the future) to understand what the process does. It offers two boxes:
- Description: A one-line box to give a title or short description to your process.
- Comments: A multi-line box to give more detailed information, for example the file format expected, explanation of the system in general.
On Error Tab
A process’s On Error tab specifies the default values for error handling of all of the tasks in that process.
When a task has its own error handling settings, those settings overwrite the process's default error handling settings. The Set All Tasks button resets the On Error properties of all the tasks included in the current process to the On Error properties of the process itself.
All other options in the On Error tab of the Process Properties dialog are the same as in the On Error tab in the Task Properties dialogs; see Using the On Error tab.