Access Manager
The Access Manager controls what rights are granted to other machines (clients and servers) on the same network. It grants access to functions such as sending documents and jobs to the server.
To open the Access Manager:
- Open PlanetPress Workflow.
- In the Ribbon, go in Tools > Managers > Access Manager.
The Access Manager dialog box is displayed. It lists all IP addresses and IP ranges that have PlanetPress Connect modules installed in the same network.
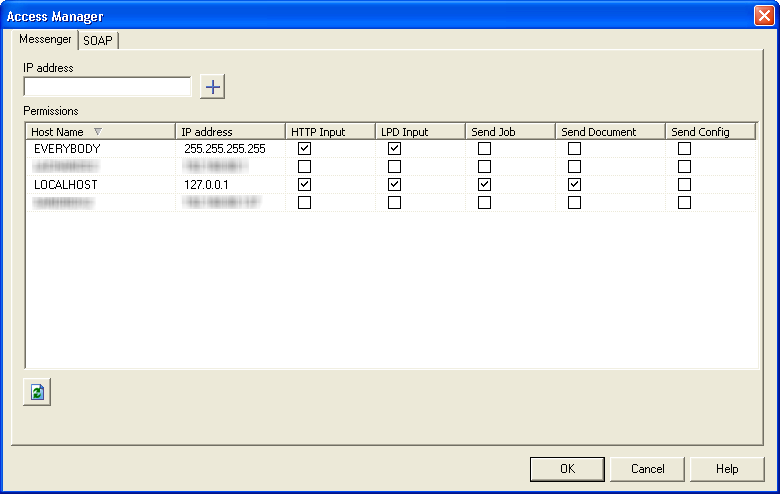
Messenger access
Manually adding new entries to the list
To grant access to the Messenger service you can manually add new entries to the list:
- Open the Access Manager.
- Make sure you are in the Messenger tab.
- In the IP address box, enter the IP address of the remote machine.
- Click on the
 button.
 - Add the necessary permissions.
- Click OK.
- Restart the Messenger service.
The format of the IP address must be one of the following:
- 127.0.0.1: The local computer. Typically this IP should have all the accesses checked.
- 255.255.255.255: Everyone on the same subnet. This is equivalent to hard-coding the current subnet, such as 192.168.1.255 or 10.0.0.255.
- 192.168.0.42: A single IP address. This can be any valid address on the same subnet.
- 10.0.255.255: Any IP in the 10.0.X.X range.
Automatically detecting machines on the network and adding them
To detect machines on the network automatically, and give them access to the Messenger service:
- Make sure the machine you want to detect is turned on and the Messenger service is started.
- Click on the Refresh button under the list.
- Add the necessary permissions to the detected machines.
- Click OK.
- Restart the Messenger service.
Removing an entry from the list
To remove an entry from the list:
- Remove all checkmarks from the entry.
- Click OK.
- Restart the Messenger service.
The following considerations are to be understood when using the Access Manager to configure IP limitations:
- Each permission type (column) is evaluated from top to bottom (column per column) in the order in which they are visible in the Access Manager window. This means that wide ranges should always be at the top to increase performance. For example, if you accept HTTP connections from any IP, the first entry should be 255.255.255.255 with the Allow checkmark in the HTTP Input box. PlanetPress does not continue processing after it has found an "Allow" checkmark. There is no concept of "Deny", meaning if any "Allow" permission is given, there is no way to later remove it for certain IP addresses or IP ranges.
- The configuration of the Access Manager is saved in a file on the hard drive which can be edited manually. See Access Manager hosts.allow File.
- HTTP, FTP and SOAP communication is not limited to the local subnet on any version where these plugins appear.
- Any change to the Access Manager requires a restart of the Messenger server which can be done in The PlanetPress Workflow Service Console.
Modifying permissions
Permissions are given simply by adding and removing options in the permission grid. Access to the services installed on this computer is granted or denied by checking the corresponding boxes next to the listed IP ranges. For each IP range, the following information is displayed:
- Host name: The name of those computers on which PlanetPress Workflow software are currently installed or which have been manually added.
- IP address: The IP address or IP address range to give permission to.
- Permissions
- HTTP Input: Grants access to send HTTP Requests to this server.
- LPD Input: Grants access to send LPD Queue jobs to this server.
- Send Job: Grants access to the selected computer or server to send jobs to PlanetPress Fax and PlanetPress Image installed on this server.
- Send Document: Grants access to the remote computer to send new or updated Connect files (templates, data mapping configurations, print presets), or PlanetPress Design Documents, to this server.
- Send Config:Grants access to the remote computer to overwrite the configuration on the local PlanetPress Workflow service
In order for the changes made here to be effective, you will need to restart the PlanetPress Messenger service. This can be done via the PlanetPress Workflow Service Console.
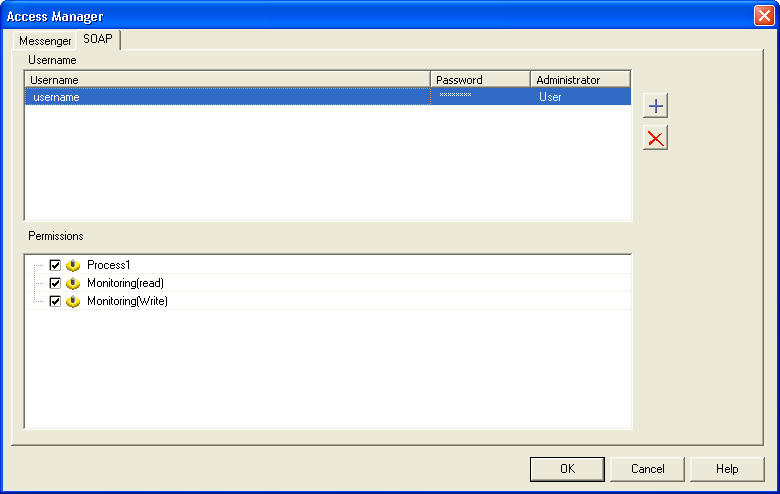
SOAP Access
The SOAP tab of the Access Manager controls access from SOAP clients to local processes and SOAP processes. Each user name entered in this dialog can have access to one or more processes.
Adding a new SOAP user
To add a new SOAP user:
- Click on the button.
- Enter the following information under the Username column for the new entry that was created:
- User name: An alphanumerical user name for the user.
- Password: A password to protect the user. Note that the password will always revert to ******** (8 stars) when clicking outside of this box - that is normal and is meant to protect the length of the password as much as its contents.
- Administrator: Choose the permission type
- User: Can access none, some, or all of the processes, selected individually in the Permissions section.
- Admin: Has access to all processes and features. When this option is selected, the Permissions section is grayed out an all options are selected in it.
- Disabled: Has access to nothing. The result is the same as not having this user defined at all, but has the advantage that a disabled user can be reactivated with a simple click.
- Define the permissions for the user (see below).
- Click OK to save the changes.
Defining or changing permissions
The Permissions section of the SOAP tab displays all of the processes that are available in the live configuration (the one that the PlanetPress service uses). To change or define the permissions for a SOAP user:
- In the top Username section, click on the user name of which to modify permissions.
- Place a checkmark in each process that the user should have access to.
- Check Monitoring(read) to give permission to the GetProcessList and GetProcessTaskList actions for SOAP.
- Monitoring(write) is currently not implemented.
- Click OK to save the changes.
In order for the changes made here to be effective, you will need to restart the PlanetPress Messenger service. This can be done via the PlanetPress Workflow Service Console.