Data Selector display preferences
The Data Selector Preferences are accessible through the Selector Options tab in the Data tab of the Data Selector. It controls how text-based data files (such as Line Printer, ASCII and Channel Skip) are displayed in the data selector.
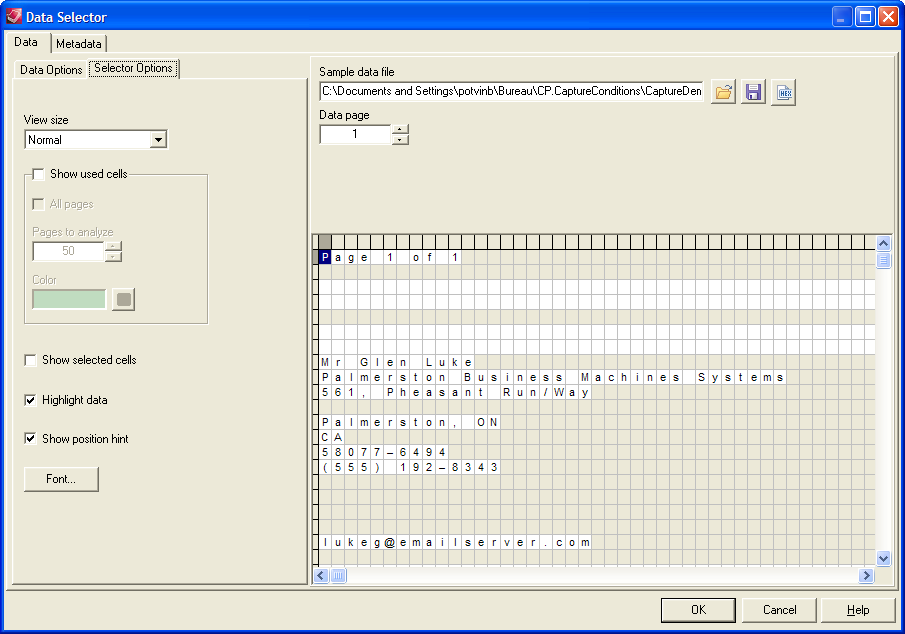
Content and appearance of the Data Pane
To adjust the content and appearance of the Data pane for all emulations except XML and PDF:
- In the Data Selector, click the Selector Options tab.
- Change the options that modify the appearance and behavior of the Data pane:
- View size: Use to adjust the size of each cell in the Data Pane, and the amount of visible data that is visible.
- Show used cells: Select this to display in green all cells that contain data. When you select this option, and your document uses any emulation other than database, you use either the All pages or Pages to analyze option to specify the number of data pages to which you want to apply the Show used cells option.
- All pages: Select to apply the Show used cells option to all pages in the sample data file. This option is not available in database emulation.
- Pages to analyze: Use this box to limit the number of data pages to which PlanetPress Workflow applies the Show used cells option. Enter the number of pages to which you want PlanetPress Workflow to apply the option, or use the spin buttons to adjust the value. This option is not available in database emulation.
- Show selected cells: Select this to display in gray all cells that your document currently references.
- Highlight data: Select to have the Data Selector highlight only those cells (or fields) that contain data from the sample data file.
- Show position hint: Select to have PlanetPress Workflow display information about the current mouse position in the Data Pane, under and to the right of the pointer as you move it in the Data Pane. If the mouse is over a current data selection, or is dragging to create a data selection, PlanetPress Workflow displays the line and column numbers that define the selection, or, in the case of a database emulation, the positions within the record set of the first and last records in the selection. If the mouse is not over a data selection, PlanetPress Workflow displays the line and column coordinates of the current mouse position), or, in the case of a database emulation, the position of the record within the record set.
- If necessary, adjust the font the Data Selector uses to display data in the Data Panel for all emulations except XML and PDF.
- Click OK.
Color of used cells
To select the color the Show used cells option will use:
- Click on the Select Color button
 .
.
Font
To set the font the Data Selector uses for all emulations except XML and PDF:
- In the Data Selector, click the Selector Options tab.
- Click Select Font.
- In the Font dialog box, set the font you want PlanetPress Workflow to use to display the sample data file in the Data Pane.
- Font: Select the font you want to use to display the sample data file in the Data Pane.
- Font style: Select a weight for the font.
- Size: Select the point size for the font.
- Sample: Displays a preview of the font selected in the Font box.
- Script: Select the system-level encoding table you want to use for the font selected in the Font box. The encoding tables available here are those available on the system on which you are running PlanetPress Workflow, and are distinct from those available when you create a style. While you can edit the encoding table a style uses, you cannot edit the system-level encoding table. If you see discrepancies between the glyphs that represent your sample data file in the Data Pane and those that appear in the data selections on the document page, the source of the discrepancy may be the encoding tables.
- Click OK.