Styling a table
Just as other elements, tables can be styled in two ways:
- With local formatting. This means styling the table directly, using the Formatting dialog.
- Via Cascading Style Sheets (CSS). In a style sheet, style rules are declared for elements with different HTML tags, ID's and classes.
These two methods are described below. See Styling and formatting for background information about these two methods.
Selecting a table, row or cell
There are several ways to select a table or row:
- Click in the table or row. Then, in the breadcrumbs (see Selecting an element) click table to select the table, or tr to select the row.
- Right-click a cell and from the shortcut menu, choose Table > Select or Row > Select.
- Click in a cell and then use the toolbar: click the Select Table button or click the black triangle next to that button and then click Select Table or Select Row.
Selecting one cell is easy: just click in it.
Use the Styles pane to see which styles apply to the currently selected table, row or cell.
Via the Formatting dialog
The Formatting dialog allows you to change the font, font size and color (see Fonts), the borders (see Border), the cell padding (the distance between the edge of the cell and its content, see Spacing), and the background color or image of the table and its cells (Background color and/or image).
To open the Formatting dialog for one cell or for the table as a whole:
- Click in a cell and choose Format > Table or Format > Table Cell.
- Right-click it and choose Cell... or Table... from the shortcut menu.
Note that in this case Table styles the table as a whole. When you choose Table and change the border, for example, the borders of the cells inside it will not be changed.
To style all cells in a table or row at the same time via the Formatting dialog, you have to select the table or row first; see Selecting a table, row or cell. Next, to open the Formatting dialog, choose Format > Table Cell. The settings that you make now will be applied to all cells in the selected row or table.
For information about specific options in the formatting dialogs, see Table Formatting dialog and Table Cell Formatting dialog.
Via a style sheet
Cascading Style Sheets (CSS) offer more ways to style a table and its contents, than the Formatting dialog does.
How to use style sheets is explained in another topic; see Styling templates with CSS files.
Note that to make a style rule apply to a specific table, row or cell, you have to add an ID or class to that table, row or cell.
Adding an ID or class to a table, row or cell
A style sheet contains a bunch of style rules for different elements, that are identified via a CSS selector. This can be the element's HTML tag (without the angle brackets), ID or class.
When used as a CSS selector, the HTML tag for a table is table. For a row, it is tr and for a cell, td. A style rule that uses one of these, however, would apply to all tables, rows, or cells. For a rule to be more specific you need to add an ID (for a unique element) or a class (for a set of similar elements) to the table, row or cell, and use that as the style rule's selector.
Before you can add an ID or class to a table, row or cell, you have to select that table, row or cell (see Selecting a table, row or cell). After selecting the cell, row or table, type the ID or class in the respective field on the Attributes pane.
In CSS, refer to the table, row or cell with #ID (where ID should be replaced with the actual ID) or with .class (where class should be replaced with the actual class).
Styling the first, last and nth rows
The CSS pseudo-classes :first-child, :last-child and :nth-child() are very useful for styling table rows
A CSS pseudo-class follows a selector to specify a special state of that selector. It always starts with a colon.
The pseudo-classes :first-child, :last-child and :nth-child() select an element only if it is the first, last or nth child element respectively. (In HTML and CSS, the word child refers to an element inside another element.)
The following CSS style rule selects the table row (tr) that comes first (:first-child) in its parent (which naturally is a table), and colors its background red:
tr:first-child {
	background: red;
}
In a Detail Table, data are in the body of the table (selector: tbody) and subtotals are in the footer (selector: tfoot).
Selecting a specific row, odd or even rows, or every nth row
The pseudo-class :nth-child() lets you select a specific row, all odd or even rows, or every nth row.
Between the round brackets in :nth-child() you can fill in a number, odd or even, or a formula: an+b. In the formula, a represents a cycle size (every...), n is a counter (for the child elements), and b is an offset value ('start at b'). The following examples will make this clear.
:nth-child(3) matches just one element: the third child element.
:nth-child(odd) matches child elements 1, 3, 5, 7, etc. The keyword odd substitutes the expression 2n+1, which in other words says: 'take every second element, starting at 1'.
:nth-child(even) matches child elements 2, 4, 6, 8, etc. The keyword even substitutes the expression 2n+0, or simply 2n.
:nth-child(3n) matches child elements 3, 6, 9, 12 etc.
:nth-child(3n+1) matches child elements 1, 4, 7, 10 etc., so every third element, starting at 1.
Via script (based on a data field value)
To style a table, row or cell based on a data field value, you have to write a script (see Writing your own scripts).
First add an ID or class to the table, row or cell that needs to be styled: select the element (see Selecting a table, row or cell) and add an ID on the Attributes pane. Then create a script, using that ID or class as the script's selector. The script can be very simple:
if (record.fields.COUNTRY == 'CANADA') {
	results.css('color','green');
}
The Designer Scripts API provides several functions to style elements, for example css(), hasClass() and addClass() (see Standard Script API).
Styling based on a value in a detail table
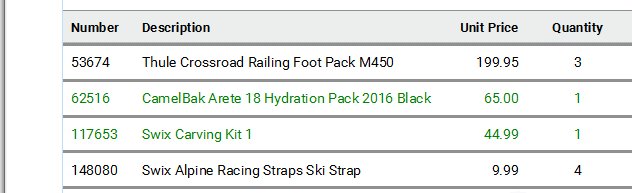
Styling rows or cells in a detail table based on a value in the detail table goes a bit different.
First set an ID on the detail table as a whole and create a script that uses thatID tbody as the script's selector. If for example the ID is table_1, the selector will be: #table_1 tbody. Then write a script like the following:
for(var i = 0; i < record.tables.detail.length; i++){
	if(record.tables.detail[i].fields['Shipped'] == 1)
	query("tr:nth-child(" + (i+1) + ")", results).css('color','green');
}
This script loops over a detail table, evaluating the field Shipped. If the value of that field is 1, it looks up the corresponding row in the results (the object that contains the selected detail table) and colors the text of that row green. (See also: query() and css().)
To keep all CSS style rules together you could add the style rules to a class in the CSS file (see Styling templates with CSS files) and assign that class to the a row or cell using addClass (see addClass()).
For another example, see this how-to: Change detail line formatting based upon a data field value.