The Image Downloader
It is important to understand that the copy of the image file the Image Downloader downloads or copies is a PostScript file. More precisely, the Image Downloader takes the image file you want to download or copy, applies any optimizations you defined for it, and creates a PostScript file that contains the optimized image (since PostScript is ASCII, the image is represented as a sequence of hexadecimal values). Thus, although the downloaded or copied image may have the same filename extension as the original file, it is not a copy of the original file.
To copy images to a folder on the host:
-
In Windows locate the external image files the dynamic image references. These images can be in any of the supported formats.
-
Copy the images to the folder on the host. This is the folder you specified in the Image box of the picture object that contains the dynamic image. Recall that this folder must be accessible to the document at runtime.
To download images to one or more printers and/or to the local PlanetPress Design Suite virtual drive:
-
Choose Tools | Application | Image Downloader.
-
In the Image Downloader dialog box, select the image files you want to copy. All image files you select must be in one of the supported image formats (BMP, EPS, JPEG, PDF, PNG, TIFF). If you want to download bitmapped images with a mix of image qualities (some are line art, some are photo), you should download each type of image quality separately. This is because you can set only one image quality for all images in a download.
-
In the Copy to list, select the destinations to which you want to copy the images. You can select one or more printers, and/or the PlanetPress Design Suite virtual drive.
-
Adjust the image settings for the download. The Image Downloader applies these settings to all of the images in the Files to download list. Note that they affect only the copy of each image; the original image remains unchanged.
Scan orientation: Select the scanline orientation for all bitmapped images in the Files to download list.
Color conversion: Define any color depth conversion you want PlanetPress Design to perform on any of the bitmapped images in the Files to download list, during the download. Select Leave as is to leave the color depth of each image unchanged. Select Convert to grayscale to convert each color bitmapped image to grayscale. Select Convert to monochrome to convert each color or grayscale bitmapped image to monochrome.
Naming convention: Specify the case and file name extension conventions you want PlanetPress Design to use for the file names of the copied images.Select File name original to have the name of each copied file appear in upper case, with the file name extension as it is on the original. Select File name no extension to have the name of each copied file appear in upper case, with the file name extension dropped.
Naming convention: Specify the case and file name extension conventions you want PlanetPress Design to use for the file names of the copied images. Select Filename [original] to have the name of each copied file appear in upper case, and the file name extension to remain as it is on the original. Select Filename w/o extension to have the name of each copied file appear in upper case, and to have the file name extension dropped. Select Filename lowercase to have the name of the copied file appear in lower case, and the file name extension to remain as it is on the original. Select Filename w/o extension lowercase to have the name of the copied file appear in lower case, and to have the file name extension dropped.
Printer path: Specify the path on the printer where you want to download the copy of the images. This path can be either a path on the hard disk or a path in flash memory. This path must exist on all of the printers you select in the Copy to list.
Image quality: Select the image quality for the bitmapped images in the Files to download list. Recall that image quality in PlanetPress Design refers to the type of content a bitmapped image contains. Select Line art if edges in the image are clearly defined and sensitive to any loss of image information. The compression PlanetPress Design applies to line art images is lossless. Note that Line art quality only works with PostScript Level 3. If you select Line art for images, and the PPD you select for the document is not for a PostScript Level 3 printer, PlanetPress Design automatically switches the image quality from Line art to Photo, and applies the compression level set for Photo quality. In most cases this results in a noticeable degradation of quality. One solution is to adjust the compression level to 100%. A compression level of 100% means PlanetPress Design does not perform any compression. This preserves all of the image information in the line art images, at the expense of not performing any compression on any of the images in the Files to download list.
Image compression level: Set the compression level you want the Image Downloader to use when you select Photo in the Image quality box. Legal values are 1 to 100.
Force PostScript mode: Select this option when the destination printer is used for printing jobs in other formats such as PJL, and when PlanetPress Suite Workflow Tools is not sending the output to the printer’s hard disk. When this option is selected, PlanetPress Design inserts the following command statement [Esc]%-12345X@PJL ENTER LANGUAGE = POSTSCRIPT to precede the document as well as any other command statement.
-
Click Download.
For each of the image files in the Files to download list, the Image Downloader makes a copy of the file. It then applies any resolution, scan orientation, color, or file name modifications you specified, to the copy. Finally it converts the copy to PostScript and downloads it to each of the destinations selected in the Copy to list. If it cannot download some or all of the images, it displays an error message to this effect.
To create a file of images, along with the PostScript code to install them on a printer:
-
Choose Tools | Application | Image Downloader.
-
In the Image Downloader dialog box, select the image files you want to copy. All image files you select must be in one of the supported image formats (BMP, EPS, JPEG, PDF, PNG, TIFF). If you want to download bitmapped images with a mix of image qualities, you should download each type of image quality separately. This is because you can set only one image quality for all images in a download.
-
Adjust the image settings for the download. The Image Downloader applies these settings to all of the images in the Files to download list.
-
Click Save to file.
-
In the Save As dialog box, navigate to folder in which you want to save the file, and enter a name for the file.
-
Click Save.
To select the images to download or save in a file:
-
In the Image Downloader dialog box, click the Browse button at the top right of the Files to download list to display the Open dialog box.
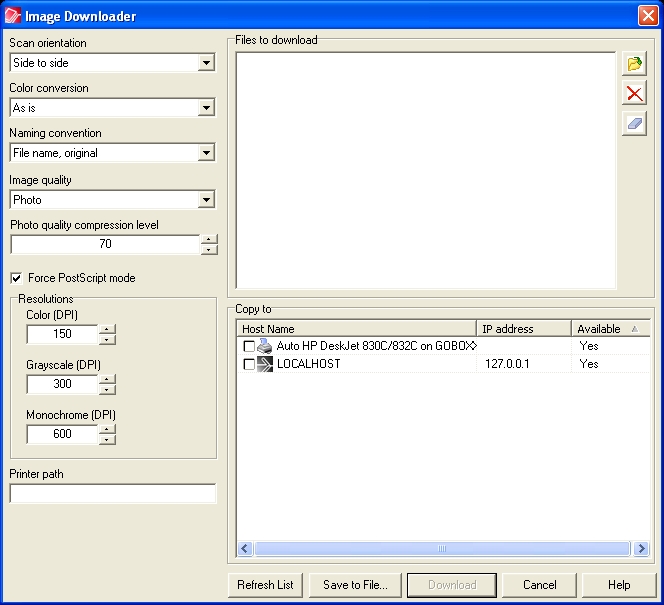
A. Browse B. Delete C. Clear
-
In the Open dialog box, navigate to the folder containing the images, and select the images you want to download and/or copy. To select more than one image file, click the first file you want to add, then CTRL+click each additional file you want to add to the selection. CTRL+click a file a second time to remove it from the selection. You can also SHIFT+click to select a range of files. Click Open to exit the Open dialog box.
-
If necessary, you can edit the content of the Files to download list as follows:
-
step 1
-
To delete one or more images from the list, select the images then click Delete. To select more than one image file, click the first file, then CTRL+click each additional file to add it to the selection. CTRL+click a file a second time to remove it from the selection. You can also SHIFT+click to select a range of files.
-
To remove all images from the list, click Clear.
-