Snapping Points
Snapping point are points on an object or group that you use to connect one object or group to another such that changes to the size or position of one affects all those snapped to it. As a simple example, consider the second page of a form letter in which the last paragraph (a text object) is followed by a signature (a picture object). The last paragraph can vary in length but the signature must always appear in the same position relative to the last line of the paragraph. You can accomplish this by connecting the text object to the picture object using snapping points.
If you snap an object to the bottom of a text object whose contents vary in length, and you want that object to always remain in the same position relative to the last line of text in the text object, be sure you select Dynamic height in the Basic attributes of the text object. Recall that the Dynamic height option is available only when Word wrap is on.
An object or group has nine snapping point sites on its bounding box: one on each corner, one in the middle of each edge, and one in the center of the object.
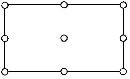
You can set a snapping point at any of the nine snapping point sites. When you snap two objects/groups together, PlanetPress Design positions the relevant snapping point of each object/group such that the two points lie one on top of the other.
You can also set a horizontal and/or vertical offset for a snapping point. You can do this to control the spacing between the two objects/groups.
When using snapping points with objects that may dynamically change width or height, you should only use Top-Left or Bottom-Left snapping points, as other snapping points may not work properly.
Here are some key points to remember when using snapping points:
- The order in which snapping points are evaluated is top-to-bottom, as seen in the Document Structure Pane for the page. Any object that has the Snap to previous object option set will snap to the first object it encounter before it. If no object before it has the Set snapping point option set, it will snap to the top-left corner of the page it is located on.
- You may snap any number of objects to a single snapping point on an object, and you may also snap groups of objects together.
- Objects will not snap if they are not on the same page.
- Objects called using the PlanetPress Talk $element command and that have snapping points set will follow snapping behaviors as if they were originally part of the page. The order in which snapping points are evaluated is the same as if you replaced the PlanetPress Talk object with each individual object called by it.