Job Queue pane
The Job Queue pane is a centralized location designed to allow the consolidation and management of print Jobs.
Jobs are not printed from here. The Job Queue could best be considered a staging area, where one can consolidate jobs in preparation for production printing.
You can add Jobs to the queue by "dragging and dropping" them from a Windows Explorer window, or from the Printer Queue pane, or by using the Add Job option.
Once in the Job queue, jobs can be previewed to confirm the contents are correct, and selected for printing by "dragging and dropping" the print Job into the Printer Queue pane.
To do this, you must have both screens visible at once, as seen here: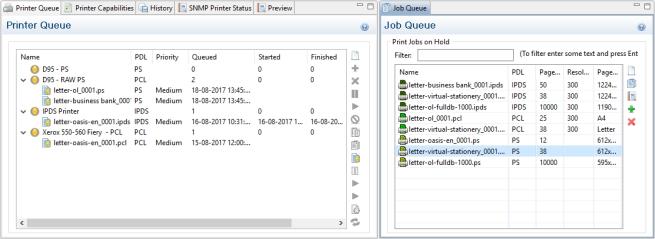
Print Jobs aren't actually scheduled for printing in the Job Queue. That is done in the Printer Queue pane. This Job Queue is a job holding/staging queue, rather than a production printing queue.
- Filter: Use this search functionality to reduce the data-set displayed in the table.
Type in a search word and then hit Enter to filter the table using the entered search word. For example, select "business" to display only those entries that feature the text "business".
To clear the filtering, delete the contents of the Filter box and press Enter.
Job Queue Table
- Name: The name of the job filename, as captured or added to the Print Manager.
- ID: An unique identity number that is automatically generated for every job.
The first few letters of the ID are coded to indicate how the job was added to the queue. The relevant codes are as follows: - HTF: Hot Folder capture. Any job that lands in the printers Hot Folder is automatically added to the Printer Queue (at the appropriate priority) and given this code.
- DRP: Jobs "dragged and dropped" directly into the Print Manager (either from Windows Explorer, or from the Job Queue pane) are given this code.
- BRW: Code for jobs added to the queue via the Add Job file browse option.
- RSB: Code used for jobs that have been Resubmitted to the printer.
- PDL: Displays the job printer language.
- Page Count: Displays the total number of pages in the job.
- Resolution: Displays the resolution, in DPI, of the job.
- Page Size: Displays the
dimensions of the job.
To the right of the table and also via right-mouse click context menu within the table, the following options are available:
-
 Preview button / context menu option: This launches a Preview pane that displays what the print job looks like.
 -
 Copy selected items to clipboard button / Copy context menu option: This copies job information (job name and folder path) to the clipboard.
 -
 Properties button / context menu option: This launches a job Details Window that displays detailed information about the makeup of the print job. Once the Details Window is open it remains atop the Print Manager thereafter, to allow simple comparisons between jobs.
To close the Details Window, put the focus upon the Details Window by clicking anywhere within it, and then press the Escape key ("Esc"). -
 Add Job button / context menu option: Click this to add a print Job to the Job Queue.
 -
 Remove Job button / context menu option: Click this to remove a print Job from the Job Queue.
 -
 Refresh button / context menu option: Refreshes the job(s) to update current page count and the like.
 -
 Directory button / context menu option: Opens the folder containing the selected file.If multiple files are selected, only the folder of the first file selected will be opened.