Printer Queue pane
The Printer Queue pane displays all the printers available for printing (as set through the Printers pane), their status and the job queues associated with each printer.
This pane allows you to add or remove print jobs to the printer's queue; to pause and then restart printing (at either the individual job level, or at the printer level); to reprint jobs: to print or reprint selected page ranges and other common print production tasks.
This pane would be the main screen used by print operators to control production printing.
Not all of the functionality on this pane will be available to all printers. Much of the Printer Queue functionality has been specifically designed to work with IPDS printers and is currently only available for IPDS printers and output files.
Where such restrictions apply will be noted on this page.
Where such restrictions apply will be noted on this page.
Job Status
When a print job is being processed by the Print Manager the job is renamed to reflect the current processing step. A new file extension is added to the job, and updated in real time, as described in the following table:
| filename.ipds | A print job that is in the queue but which has not yet begun processing. |
| filename.ipds.Started | A print job that is now active. It is currently being processed. |
| filename.ipds.Committed | The print job has successfully been sent to the printer and is now being Committed. |
| filename.ipds.Finished | This print job has been processed. |
| filename.ipds.Queued | This print job has been resubmitted and is queued for processing. |
These file extension entries generally match those found in the Printer Queue Table "Job State" field.
Printer Queue Table
This table displays information about both the available printers (which can be added or removed via the Printers pane) and their associated job queues.
Clicking on selected column titles (such as Name, PDL and Priority columns) will re-sort the Queue display based upon the column selected. Clicking on the column title a second time will reverse the order.
The fields the table contains are broken down as follows:
- Name: Displays the
name of the printer and beneath it are the names of all the print jobs currently residing in the printer's job queue.
Print jobs can be added or removed from the printer's queue by a variety of means. Such as dragging and dropping jobs between the Job Queue pane and the Printer Queue panes. When a job is added from the Job Queue pane thus, it is then removed from the Job Queue pane thereafter.
Jobs can also be added by right-click context menu options available at the printer level.
The options include adding complete jobs via Add Job, or partial jobs (IPDS only) via the
  Add Job with Page Range option.
Jobs can also be dragged from one printer to another within the Printer Queue pane itself. - PDL: Displays the printer language (for both the printer and print jobs).
- ID: An unique identity number that is automatically generated for every job.
The first few letters of the ID are coded to indicate how the job was added to the queue. The relevant codes are as follows: - HTF: Hot Folder capture. Any job that lands in the printers Hot Folder is automatically added to the Printer Queue (at the appropriate priority) and given this code.
- DRP: Jobs "dragged and dropped" directly into the Print Manager (either from Windows Explorer, or from the Job Queue pane) are given this code.
- BRW: Code for jobs added to the queue via the Add Job file browse option.
- RSB: Code used for jobs that have been Resubmitted to the printer.
- Priority: Displays
the priority with which the job is to be printed: Low, Medium or High.
Jobs are processed in the queue in the following order: High, then Medium, then Low.
Job priorities can be changed on the fly, through the

 Set to xxxx Priority context menu options.
 - Queued: At the Printer level this displays the number of
jobs currently queued to the printer. At the print job level it displays the
date and time that the job was added to the queue.
This counter updates in real time. - Started: At the Printer level this displays the
total number of jobs that were started on this printer. At the print job level it displays the
time an individual job started printing.
Please note, this counter updates in real time, but always adds to the existing Printer total. Use the Reset Printer Counters option to re-set the current Printer total to zero.
 - Finished: At the Printer level this displays the
total number of jobs that have finished on this printer. At the print job level it displays the
time an individual job finished printing.
Please note, this counter updates in real time, but always adds to the existing Printer total. Use theReset Printer Counters option to re-set the current Printer total to zero. - Job State: Displays the individual print job status. These could be Queued, Finished, Started, and such like. For IPDS printers the "Page Counters" entry in the "Extended Options" section of the Printer Settings Dialog sets the criteria that determines whether a job is Finished or not.
For example, if the "Page Counters" entry is set to Stacked, then the job is only considered Finished when the printer's Stacked pages counter equals the amount of pages in the job. - Page Range: Displays the range of pages to be printed. The default is to print the entire page range, but this can be cut down to a specific sub-set of pages via the Resubmit Range of Pages option.
- Printed Pages: At the print job level this displays the number of printed pages in the current job. At the Printer level this displays total number of pages printed on the printer.
Please note, this counter updates in real time, but always adds to the existing Printer total. Use theReset Printer Counters option to re-set the current Printer total to zero. - Job Pages: Displays the total number of pages in the job.
For IPDS printers the "Page Counters" entry in the "Extended Options" section of the Printer Settings Dialog sets the criteria that determines whether a job is Finished or not.
For example, if the "Page Counters" entry is set to Stacked, then the job is only considered Finished when the printer's Stacked pages counter equals the amount of pages in the job.
For example, if the "Page Counters" entry is set to Stacked, then the job is only considered Finished when the printer's Stacked pages counter equals the amount of pages in the job.
The following options are available via right-mouse click context menus. The options that display will be dependent upon what has been selected (Printer or Job) and the current state of the selected item.
Printer Queue Options
These options will only be made selectable when they are actually currently available.
If an option is not available to the current selection or setting, it will not be accessible.
If an option is not available to the current selection or setting, it will not be accessible.
-
 Start Printer Queue: Select to
start a printer which has been stopped, or which has been recently added.
Start Printer Queue: Select to
start a printer which has been stopped, or which has been recently added.
Stopped printers have a yellow status icon to indicate that the printer is not currently active. Started printers have a green status icon, to indicate that the print queue is currently active.
The PostScript printer entry in the following image shows how a printer error state is represented within Print Manager when a printing or connection error occurs. The printer is still active (and thus the printer status icon remains green), whilst the job itself is stopped due to the error. This printer is, in effect, in a paused state whilst it waits upon the error being fixed, or the job being removed from the queue.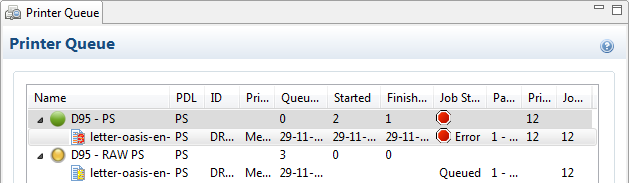
-
 Stop Printer Queue: Select to
stop an active printer in the printer queue.
Stop Printer Queue: Select to
stop an active printer in the printer queue.
Once selected, that printer's queue is immediately stopped and the printer status icon turns yellow to indicate that the printer is not active. -
 Refresh: Select to
refresh the connection to a printer. This is handy when the communication between printer and Print Manager has encountered issues.
Refresh: Select to
refresh the connection to a printer. This is handy when the communication between printer and Print Manager has encountered issues. -
Add Job: Select to add
new job(s) to the selected printer. Several jobs can be added at once.
-
Add Job with Page Range Select to add
a specified
sub-set of an IPDS job. This launches the Add Job with Page Range Dialog in which the job and it's required page range can be set.
-
 Remove Finished Jobs: Select to remove any Finished Jobs from this printers Printer Queue display, making the visual monitoring of active and scheduled jobs easier.
 -
Reset Printer Counters: Select to update the printer information job counters. This resets the number of jobs Queued, Started or Finished.
- Stack Received Pages: Select to push out the last page committed into the printer stacker.
Printer Queue Job Options
These options will only be made selectable when they are actually currently available.
If an option is not available to the current selection or setting, it will not be accessible.
If an option is not available to the current selection or setting, it will not be accessible.
-
 Preview button / context menu option: This launches a Preview pane that displays what the print job looks like.
 -
 Pause Job: Select to temporarily pause the current IPDS job on the printer queue. This option only works for IPDS print jobs and the option is only available when the printer queue is active.
Once a job is paused, the job queue for this printer is in effect paused as well, until the paused job is either restarted or cancelled. -
 Resume Job: Select to resume a currently paused IPDS job. This option is only ever active when an IPDS print job is paused in the printer job queue.
 -
 Cancel Job: Select to cancel the currently active job (even if paused). This option only works for IPDS print jobs and the option is only available when the printer queue is active.
Cancelling the active job will also stop the printer, rather than have it continue onto the next job in the print queue.
A cancelled job can be restated at a late time. It can either print in full, via Resubmit, or continue from where the job was cancelled, via Resubmit Range of Pages and specifying the starting page as the page the job was cancelled on, -
Refresh: Select to
refresh the job information. This allows close monitoring of individual jobs.
-
 Remove Job: Select to
delete the currently selected job(s) from the Printer Queue.
Remove Job: Select to
delete the currently selected job(s) from the Printer Queue. -
 Resubmit Job: Select to restart the selected job(s) from the beginning. If the original job had been processed using a page range selection, it will be resubmitted using the same page range.
 -
Resubmit Range of Pages: Select to resubmit an IPDS job, but with a specified page range selection. This launches the Add Job with Page Range Dialog in which the job and it's required page range can be set.
This option is very useful when recovering from a print job failure, when a print job has only been partially printed, and you wish to complete the job. The dialog box will present you with a range of options as to where to re-start the job from. -
 Re-assign to Job Queue: Select to take the selected job(s) out of the Printer Queue and place it back in the generic Job Queue. The same can be achieved by dragging and dropping the job from the Printer Queue to the Job Queue.
This option is available when the print Job has yet to be processed. Either when the Printer is in a paused state, or if the Printer is active but has not yet reached this Job in the Printer Queue. -
 Set Job on Hold: Select to hold this job on the printer queue. When held a job will not print, until it is once again activated by assigning a new job Priority. At which point it becomes active again, and will be process at the selected priority.
 -
Set to Low Priority: Select this to set the job priority to Low. This will immediately drop the job below any/all Medium or High priority jobs in the queue, as well as taking a job off Hold, if it had been held.
-
Set to Medium Priority: Select this to set the job priority to Medium. This will immediately drop the job below any/all High priority jobs in the queue, but above all Low priority jobs, as well as taking a job off Hold, if it had been held.
-
Set to High Priority: Select this to set the job priority as High. This will immediately push the job above any/all Medium or Low priority jobs in the queue, as well as taking a job off Hold, if it had been held.
-
 Directory: Select to open a Windows Explorer window set to the directory containing the job file.
 -
 Set Finished: Select this to change a Committed job status to Finished. This option is only available to Committed jobs. It is a way to manually set a completed job to Finished, when the Print Manager has not automatically done so (as can happen, in some scenarios).